
Puzzle knowledge · Read the arrangement behind the shapes
Ribbon Cut vs Random Cut Jigsaw Puzzles
Quick summary
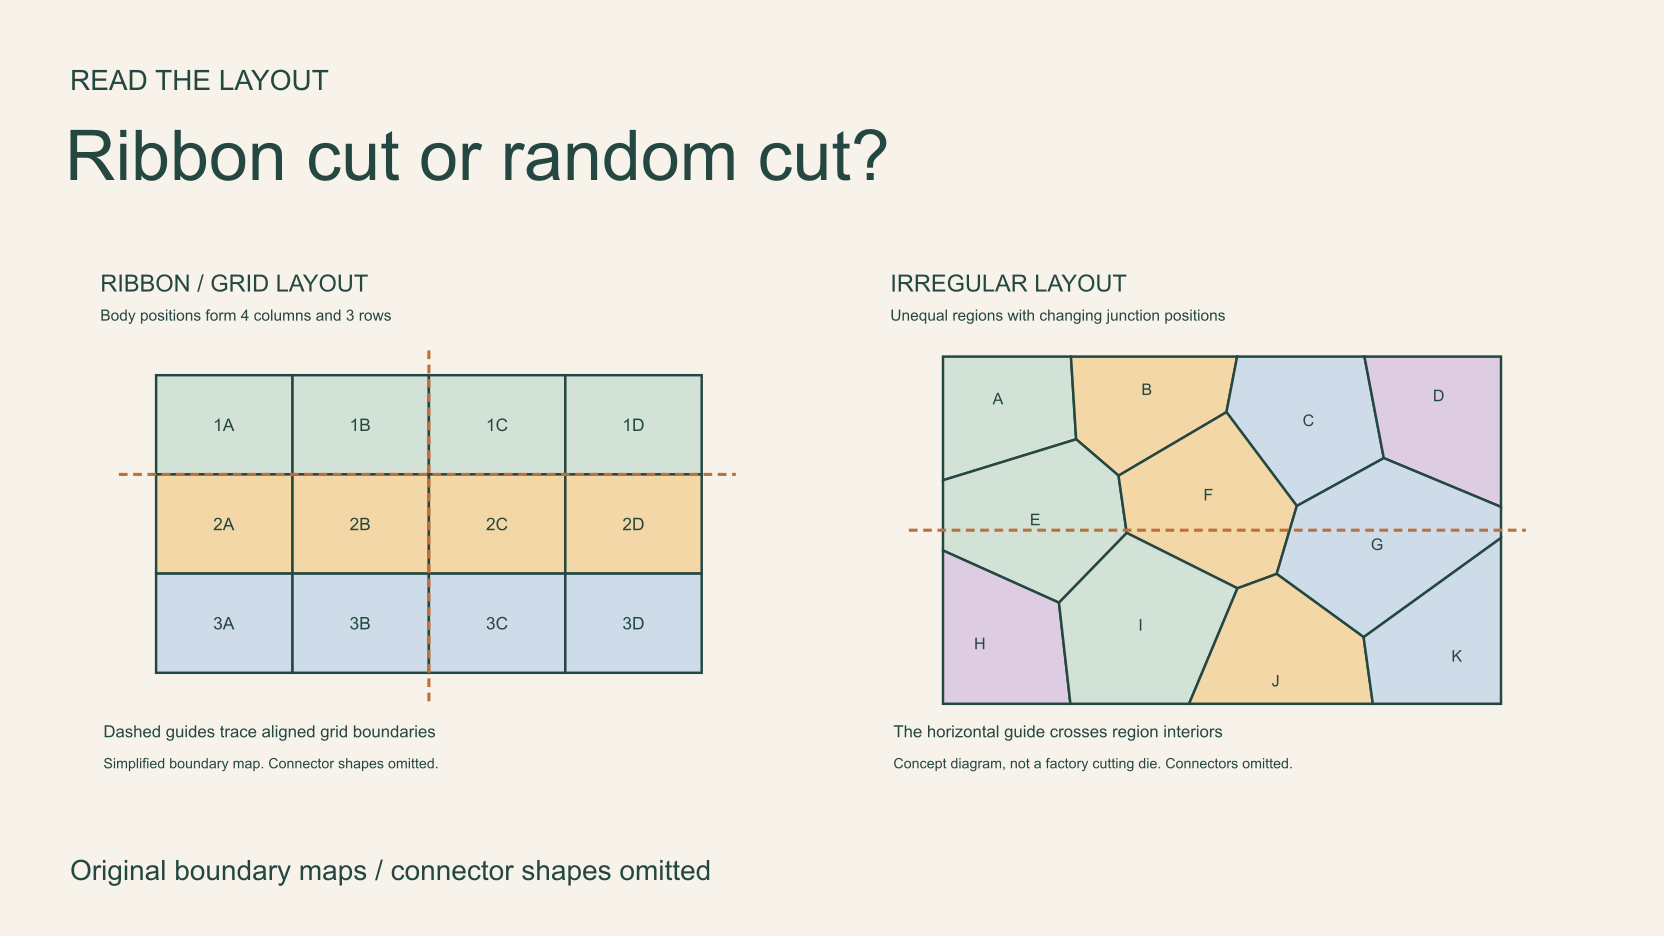
Ribbon cut and random cut jigsaw puzzles differ in how their pieces are arranged when assembled. Ribbon or grid cut layouts have recognizable rows and columns. Random cut layouts use less regular shapes and boundaries, so the assembled pieces do not form that same neat grid.
Look across several neighboring pieces before deciding. A single unusual tab tells you little about the whole layout. The original diagrams below remove the picture and simplify the boundaries so you can examine the arrangement. We also checked the fixed grids used by JigsawPuzzle.pro.
Key takeaways
- 01Look for repeated rows and columns across an assembled area.
- 02Separate the arrangement of piece bodies from the direction of their connectors.
- 03Use the site’s 12-piece grid as a concrete example, without assuming every puzzle uses it.
Look for rows and columns
MasterPieces describes ribbon cuts as mostly uniform shapes arranged along a grid. Its random-cut description emphasizes varied shapes and sizes. Cobble Hill’s explanation makes the assembled layout especially clear, showing ribbon pieces in rows and columns and describing its own random cuts as an abstract pattern.
Read the MasterPieces comparison of the two cut styles.
Begin with an assembled patch or a photograph where the seams are visible. In a ribbon layout, try following one strip of pieces across the picture. Then look for a neighboring strip with a similar direction and height. Repeat the check vertically. You are looking for a repeated arrangement across the patch.
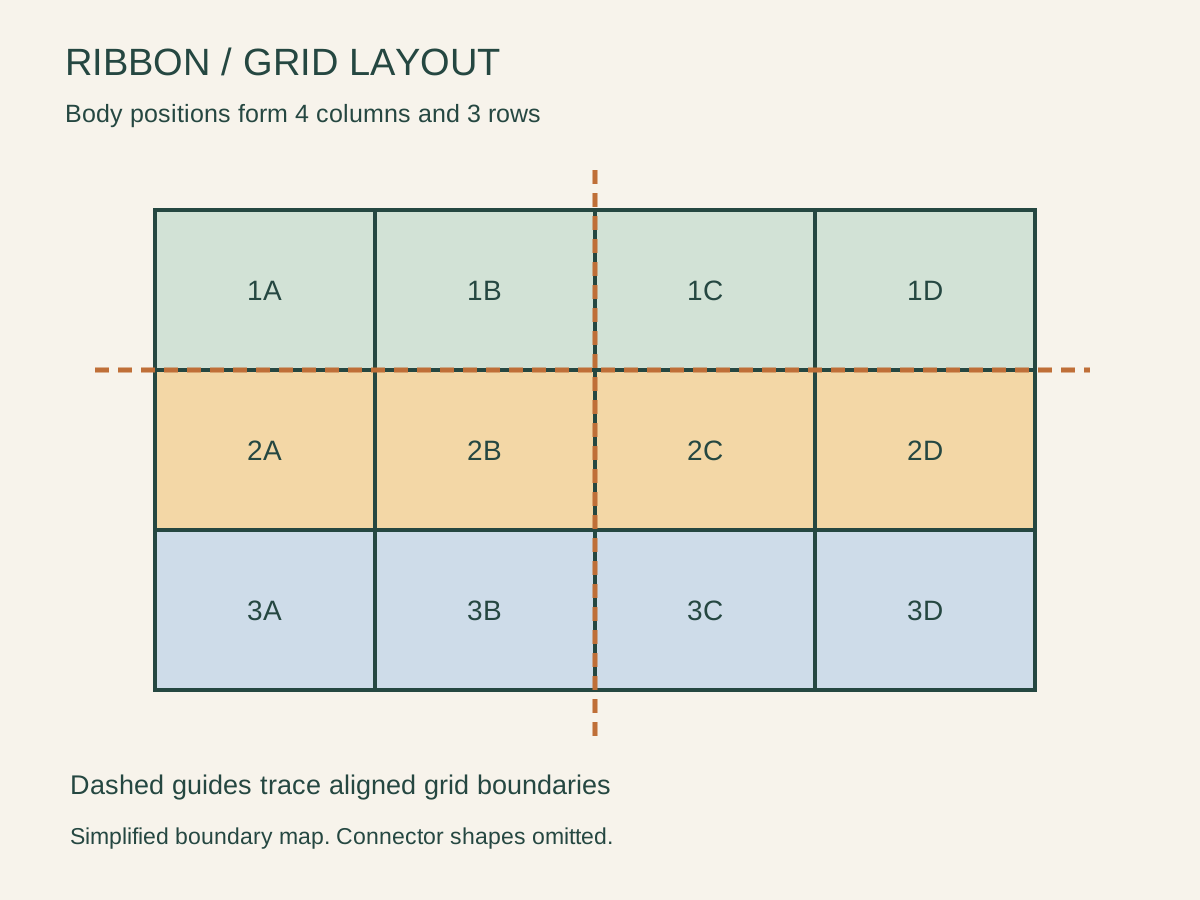
In this drawing, the middle row contains 2A through 2D. Column B contains 1B, 2B and 3B. Those two descriptions identify intersecting strips in the same layout. The labels give you a way to check the pattern without depending on the illustration’s colors.
Real tabs bend across the apparent row boundaries, so do not expect every seam to follow a ruler-straight line. Mentally set those small projections aside and look at the main bodies of the pieces. The first diagram uses plain rectangles to make that underlying structure visible.
Compare the boundary layout
Now look at the second drawing. The regions have different widths and angles, and their junctions occur at different heights. The dashed horizontal guide crosses several region interiors instead of tracing a shared boundary. You cannot label this map with the same repeated row-and-column cells used in the first drawing.
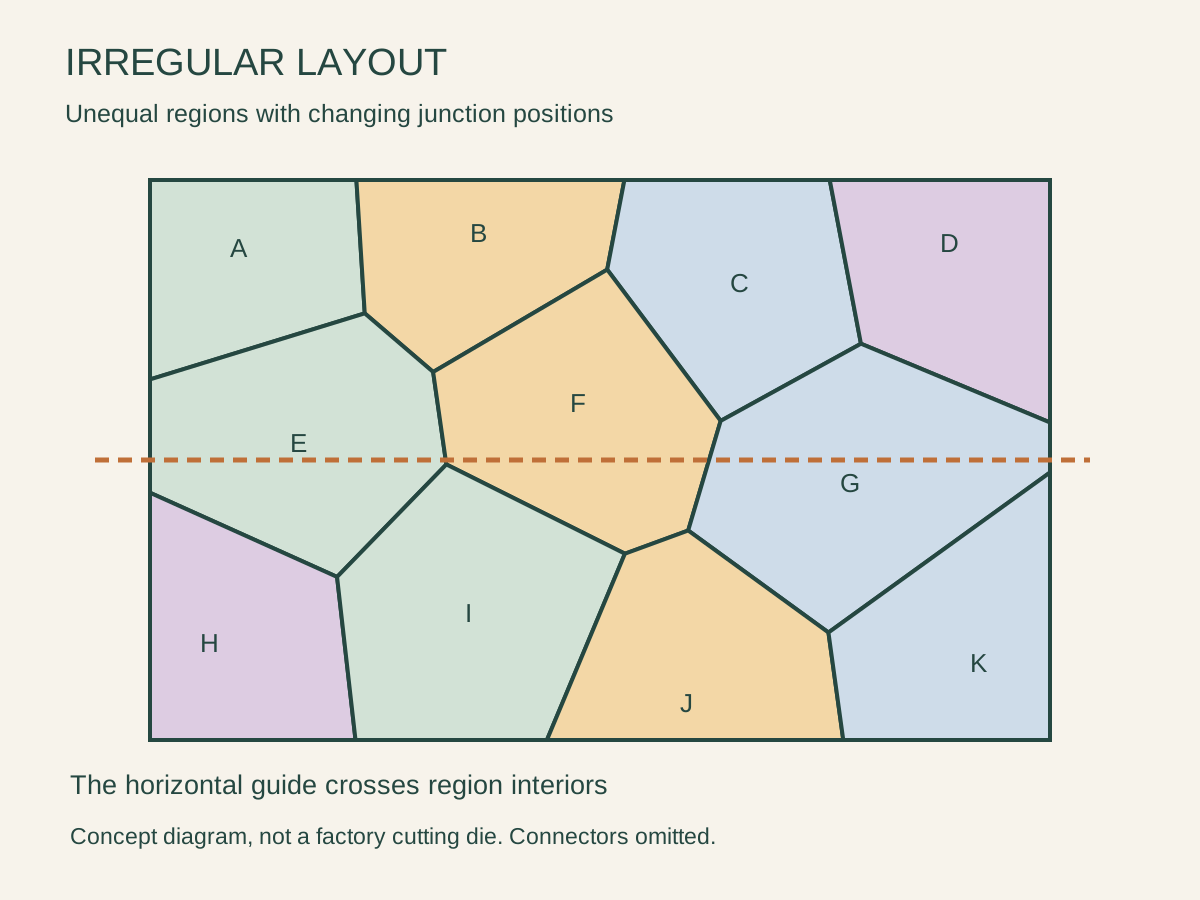
The straight polygon sides keep the map readable at a small size. Physical random-cut pieces can have curved, narrow or elongated outlines, as Cobble Hill’s own examples show. Use the diagram to compare arrangements, then inspect the actual seams of the puzzle you are considering.
Compare Cobble Hill’s photographed examples and manufacturer explanation.
| What to inspect | First diagram | Second diagram |
|---|---|---|
| Repeated strips | Three rows and four columns | No matching rectangular cell grid |
| Boundary alignment | Shared row and column boundaries | Junctions change position |
| Individual regions | Equal rectangular base cells | Unequal polygon regions |
Keep the outside border separate from this check. Both diagrams fill a rectangular picture. Their different interior layouts remain visible even though their outer frames share that shape. A rectangular box illustration or a straight edge piece alone does not settle the cut style.
If the only available picture hides the seams, leave the classification open. A few loose pieces can suggest what to inspect next. Ask for an assembled detail or check the manufacturer’s description before naming the whole pattern.
Separate layout from connector direction
A tab projects into a neighboring blank. Their directions can vary while the main piece bodies stay in a regular grid. In the site example below, the dashed base-cell lines remain aligned even where the visible outlines curve across them. Follow those positions across the board before judging the cut.
Use the piece-name guide if tabs and blanks are unfamiliar.
This distinction also helps with a scattered online board. Moving pieces into a loose pile changes their current positions. It does not tell you where their bodies belong in the finished picture. Check the intended assembled arrangement, rather than treating the shuffled starting screen as a cutting pattern.
Cut style also leaves the order of assembly open. You can build a recognizable object or a small matching section before completing a strip. A visible grid describes where pieces belong; it does not require you to finish each row in sequence.
Neither layout label gives a reliable difficulty score on its own. MasterPieces discusses challenges in both styles, while Cobble Hill reports differing preferences among its puzzlers. This guide compares visible structure. It does not measure solving speed or establish a durability advantage for either cut.
Recognize the layout used by this site
Follow the four-step explanation of how this site gives neighbors complementary piece edges.
JigsawPuzzle.pro currently uses fixed rectangular grids. Easy has four columns and three rows, making 12 pieces. Medium uses six by four, Hard eight by six, and Expert twelve by eight. The counts change, while the row-and-column organization remains.
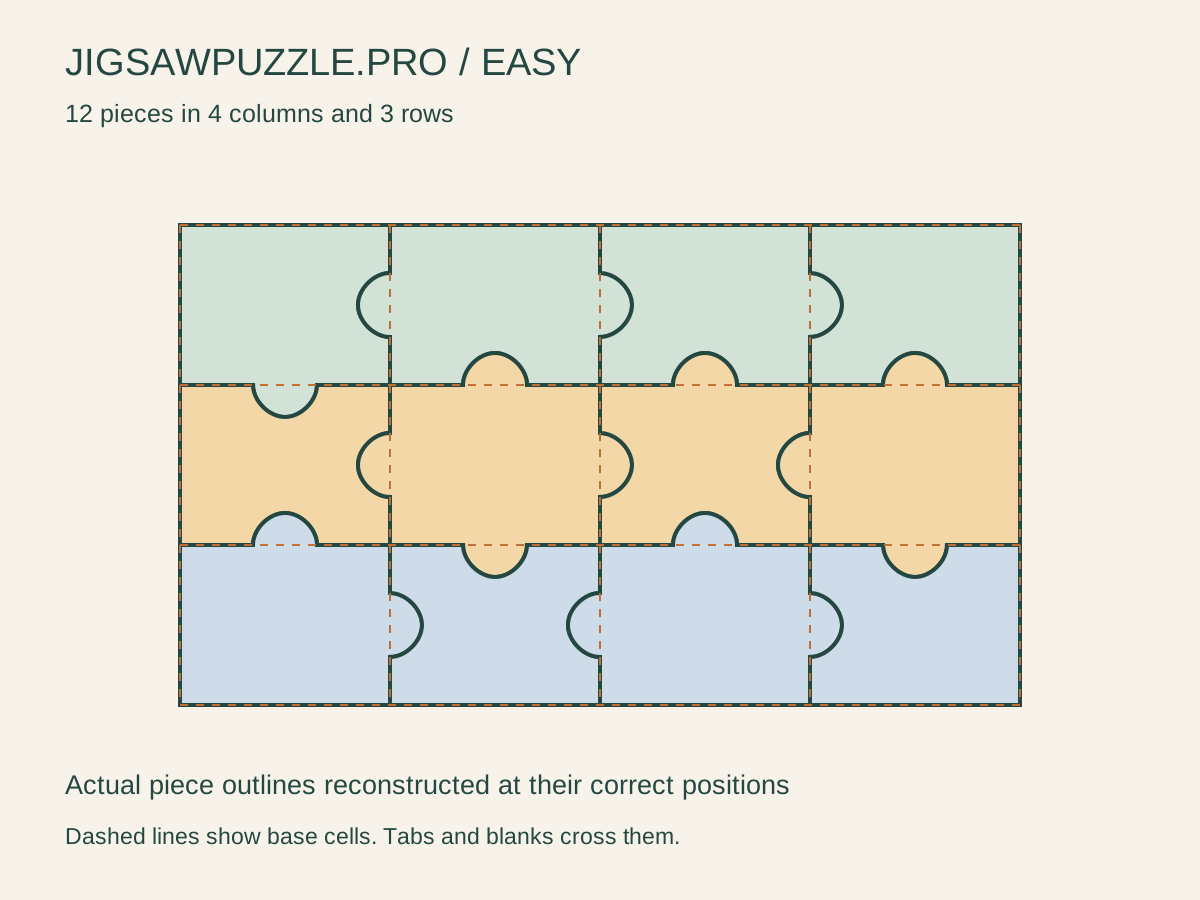
We checked all four counts with two fixed seeds. Every piece kept its expected row and column position in the assembled layout. The generator varies tab and blank directions on internal edges, which does not make this a random-cut option. The site currently has no cut-style selector.
We also opened Mountain Sunset as a 12-piece board in Chrome, moved one piece and opened the full reference picture. That check confirmed the playable example and controls. The assembled diagram comes from the piece generator; the browser check did not include solving the full board.
Open the gallery and choose Easy to inspect a 12-piece example.
Use the solving guide when you want a routine for building matching sections.
For your next comparison, examine an assembled patch, trace a strip in each direction and describe what you can actually follow. If the evidence shows a repeated grid, use that observation. If the seams remain hidden, keep the cut style unconfirmed.
Sources and further reading
Frequently asked questions
Next move
Inspect a small grid in play
Choose a gallery image and start with Easy to examine a 12-piece board.